We talked about this at the digi-crop last week, so I wanted to send these tips to you, just in case you're interested.... If you start with your January 2011 photos you'll be CAUGHT UP! :)
Here are some organizing tips:
Organizing and Uploading Your Photos
(1) You'll want to isolate and edit your favorites before you upload. However you go about it, your goal is to get your favorites separated from the duds. Most programs have a "flag" or "tag" feature (may be called something else). As you scroll through your January photos, flag or tag your favorite photos. Go ahead and flag ALL your favorite January photos. Even if you don't use them all in your yearbook, you may eventually want to use them in a different project. This step is SO HELPFUL because when you upload to HM, you won't want to upload all the bad photos. And it's much easier to pick your favorites in your photo management program than on the HM upload screen. Also, you should edit your favorites for red eye, brightness and color balance as you cannot do those tasks in the HM Studio (yet).
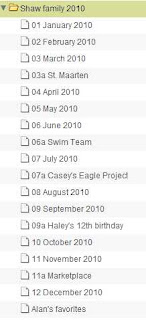
(2) In your HM account, create a folder for the year (like 2010). Then create an album in the 2010 folder for January. I like for the albums to be listed in order so I add 01, 02 etc. before the months, or they will be alphabetized and out of order. I add an "a" or "b" for special layouts, like "06a Swim Team" for example. See the sample to the left above.
Hope that's helpful.
Have you noticed the COPY and MOVE buttons in your albums yet? I can get online with you to show you how to use those.
Happy Organizing - nothing else to do on these nasty rainy days (plus it keeps my hands busy so I don't just keep eating)!
Here's a quick youtube video to show you how to upload your photos to HM.
Here's a quick youtube video to show you how to upload your photos to HM.

No comments:
Post a Comment