Monday, February 21, 2011

Senior Mom's Club

I’m so excited to get our group together and get started on our graduation projects! These will truly become instant family heirlooms and lifelong treasures for our graduates. You should feel so proud to be taking the time to do this!

We will meet three times over the next three months. If you attend each time and complete small and very manageable tasks in between, you’ll be ready to publish your project and get it back in time for graduation day! If you ever need help in between our meetings, we can always meet online anytime.

Here’s what you need to do to prepare for that first meeting:

  1. Pick out a project template from the templates below. You can click on the image or the links below the images, which also have a description of the projects. Look for a project that has an overall layout that appeals to you. ANYTHING and EVERYTHING on any page and the covers can be changed, so just look for a general layout (how the photos are organized on the pages) that you like.
  1. Upload at least 10 photos to your account. To do this, login to your account, click My Photos (top tabs) and then create a FOLDER with the name of your graduate. Within that folder, you can add ALBUMS for each of the 2-page spreads in your book, i.e. Birth, School, Sports, etc. Here is a short youtube video that shows how to upload your photos: Upload photos to your Studio account (6:18)
  1. Start gathering items you’d like me to scan. Examples include: photos, certificates, report cards, etc. Photos must be loose (not in frames or albums) when you bring them to me next week and cannot be wider than 8.5”. If you want to include larger items or trophies, medals or other items, take a picture of those items in good light and upload those into your account.

We still have room for a couple more moms, so spread the word this week! See you on the 21st!


Click on the links below to see a preview of these projects:

ALL TEMPLATES ARE FULLY CUSTOMIZABLE

I’LL SHOW YOU HOW TO MAKE IT

JUST LIKE YOU WANT IT!

http://www.heritagemakers.com/projectBrowserStandAlone.cfm?projectID=1332459&productId=9&sponsorID=250202

(HS graduation cornerstone book – 11” x 8.5” hardcover book – 60 points with 21 pages – can add up to 99 pages for 1 pt/page)

http://www.heritagemakers.com/projectBrowserStandAlone.cfm?projectID=1398340&productId=60&sponsorID=250202

(Senior Send-off - 8 x 8” board book – 15 page limit – 60 points)

http://www.heritagemakers.com/projectBrowserStandAlone.cfm?projectID=1358866&productId=3&sponsorID=250202

(Advice for a daughter - 7 x 5” hardcover book – 40 points with 21 pages – can add up to 99 pages for 1 pt/page)

http://www.heritagemakers.com/projectBrowserStandAlone.cfm?projectID=1358950&productId=3&sponsorID=250202

(Advice for a son - 7 x 5” hardcover book – 40 points with 21 pages – can add up to 99 pages for 1 pt/page)

http://www.heritagemakers.com/projectBrowserStandAlone.cfm?projectID=1346721&productId=5&sponsorID=250202

(Graduation Party Guest book – 8 x 8” hardcover book – 50 points with 21 pages – can add up to 99 pages for 1 pt/page)

http://www.heritagemakers.com/projectBrowserStandAlone.cfm?projectID=1654456&productId=15&sponsorID=250202

(Graduation Announcement 5” x 7” greeting card – 3 pts/card)

http://www.heritagemakers.com/projectBrowserStandAlone.cfm?projectID=1652161&productId=57&sponsorID=250202

(Gallery-Wrapped Canvas – 16” x 20” – 90 points)

http://www.heritagemakers.com/projectBrowserStandAlone.cfm?projectID=721150&productId=5&sponsorID=250202

(Child’s Story – 8 x 8” hardcover book – 50 points with 21 pages – can add up to 99 pages for 1 pt/page)

http://www.heritagemakers.com/projectBrowserStandAlone.cfm?projectID=765507&productId=9&sponsorID=250202

(Child’s Story #2 – 11.5 x 8.5” hardcover book – 60 points with 21 pages – can add up to 99 pages for 1 pt/page)

http://www.heritagemakers.com/projectBrowserStandAlone.cfm?projectID=1668645&productId=11&sponsorID=250202

(12 x 12” hardcover book - 82 points with 27 pages – can add up to 99 pages for 2 pts/page)

Friday, February 4, 2011

Organizing Your Photos in Your Heritage Makers account


We talked about this at the digi-crop last week, so I wanted to send these tips to you, just in case you're interested.... If you start with your January 2011 photos you'll be CAUGHT UP! :)

Here are some organizing tips:
Organizing and Uploading Your Photos

(1) You'll want to isolate and edit your favorites before you upload. However you go about it, your goal is to get your favorites separated from the duds. Most programs have a "flag" or "tag" feature (may be called something else). As you scroll through your January photos, flag or tag your favorite photos. Go ahead and flag ALL your favorite January photos. Even if you don't use them all in your yearbook, you may eventually want to use them in a different project. This step is SO HELPFUL because when you upload to HM, you won't want to upload all the bad photos. And it's much easier to pick your favorites in your photo management program than on the HM upload screen. Also, you should edit your favorites for red eye, brightness and color balance as you cannot do those tasks in the HM Studio (yet).

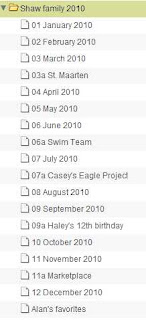
(2) In your HM account, create a folder for the year (like 2010). Then create an album in the 2010 folder for January. I like for the albums to be listed in order so I add 01, 02 etc. before the months, or they will be alphabetized and out of order. I add an "a" or "b" for special layouts, like "06a Swim Team" for example. See the sample to the left above.

Hope that's helpful.
Have you noticed the COPY and MOVE buttons in your albums yet? I can get online with you to show you how to use those.

Happy Organizing - nothing else to do on these nasty rainy days (plus it keeps my hands busy so I don't just keep eating)!

Here's a quick youtube video to show you how to upload your photos to HM.